What can you do with Destroy FX + MIDI?
Most of our Destroy FX plugins can be controlled, at least to some degree, with MIDI. There are a few types of control: parameter automation with CCs, channel aftertouch, program changes, and note/pitchbend control.
All DFX MIDI is handled omni-style (receiving from any MIDI channel). Being able to use MIDI with effect plugins depends on whether your host software supports that (see the notes about compatibility below).
control with notes + pitchbend:
Some of our plugins can be controlled with MIDI notes and pitchbend. Rez Synth needs notes, otherwise it can't do much of anything. It likes pitchbend, too. Some of our other plugins are enhanced with MIDI note control but don't require it. Buffer Override is a lot more fun with notes and pitchbend. They control the buffer divisor parameter. Skidder can be triggered with notes. Scrubby uses notes for turning transposition steps on or off in pitch constraint mode.
automate parameters with control messsages:
You can automate any parameter on Destroy FX plugins with MIDI CCs (continuous controller messages). Assigning CCs to parameters is done with a "MIDI learn" function. What you do is press the MIDI learn button on the plugin, then click on some parameter, and it will become the "learner" (some controls will light up when you do this to make it obvious). As soon as you produce some MIDI CC message (with a MIDI device or from your sequencer), that incoming CC assigns itself to the learner parameter. From that point on, the parameter can be automated with messages from that CC. If another CC was already assigned to that parameter, then the old CC gets un-assigned. Each parameter can only have one CC assigned to it, but you can assign the same CC to more than one parameter (see the advanced stuff section below if you don't like that). After you learn a MIDI control to a parameter, MIDI learn mode automatically exits. You can also exit MIDI learn mode manually by clicking on the MIDI learn button to toggle it off.
Channel aftertouch (aka channel pressure) can be assigned to control any parameter in the same manor as CC messages.
If you want to erase all of the control assignments that you've made, press the MIDI reset button. If you want to erase the assignment for only one parameter, you can turn on MIDI learn mode, click on the parameter, and then click on the MIDI reset button. That parameter will lose its assignment but the rest of the parameters will keep theirs.
By default, Destroy FX plugins don't care on which MIDI channels the events are received; the events are handled omni-style (see the advanced stuff section below if you don't like that).
MIDI control assignments are saved in host song files and also in exported preset files (in VST, though, only with "bank" files, not "program" files), so you don't need to reconfigure them each time you open your song or load a preset settings file. Also, the control assignments that you configure stay the same when you switch between presets in a plugin.
Some of our plugins also allow you to assign the pitchbend wheel and even notes to control parameters (see the advanced stuff section below).
You can assign almost any CC to a parameter (all except 123), but you should realize that some CCs are special and might be handled in specialized ways by the particular sequencer/DAW that you use. Some CCs are technically supposed to be "on/off" values and not utilize the full 0 to 127 value range. Your sequencer might force these ones to output as only 2 values, so keep that in mind if you find them not working properly. There are also a few other CCs are "single value" and are only supposed to use 0. Also, some CCs are supposed to handle special major functions, like turning all sound off or all notes off. Your sequencer might produce these on its own for the purposes of general MIDI communication. Here's a list of the "special" CCs:
64-69 and 122 are on/off (2 values)
120-127 are for major stuff
120, 121, 123 - 125, and 127 are single-value
In particular 123 (7B) is special. It is the "all notes off" command, and we do not allow this CC to be assigned to parameters because virtually every sequencer sends this command when starting and/or stopping sequencer playback, so it's not necessarily a good idea for you to be sending these messages to your sequencer.
We don't know about all of the sequencers out there, but Logic resets CC 1 (mod wheel), CC 64 (sustain pedal), and CC 123 (all notes off) to 0 when stopping and starting the sequencer, so be careful with those. Also, Logic uses CC 7 for volume and CC 10 for pan. It intercepts CC 7 and 10 messages and does not pass them along to plugins.
If you want to play it safe, CCs 12-63 and 70-119 are probably good ranges to work with.
Some host apps (like Ableton Live and AudioMulch, for example) can manage CC control of plugin parameters on their own. So if you use software like that, then you can just decide whether you want to use our plugins' built-in CC control system or use your host's system.
* * * advanced stuff (fancy) * * *
assigning pitchbend and notes to parameters via MIDI learn:
If the plugin is already using either of those things for dedicated purposes (see the section above), then you can't assign them to parameters with MIDI learn (that's means no note assignments in Buffer Override, MIDI Gater, Rez Synth, Scrubby, or Skidder and no pitchbend assignments in Buffer Override or Rez Synth). Assigning pitchbend to a parameter is just like assigning a CC. Assigning notes is more complicated. If the parameter is a switch or button sort of thing, then you can assign a single note to that parameter and then, each time you play that note, you will toggle the parameter to its next setting. For other parameters, you need to assign 2 notes to define a range over which you can play notes and the notes will be mapped to values for that parameter. To do this, turn MIDI learn on, click on a parameter, play a MIDI note, and then play another MIDI note.
enabling or disabling omni operation:
The default behaviour in Destroy FX plugins is to ignore the MIDI channel on which events are received. If instead you want our plugins to pay attention to MIDI channel when distinguishing between events, you can change the behavior by enabling the contextual menu option "MIDI assignments use channel".
enabling or disabling parameter assignment stealing:
When assigning MIDI stuff to control parameters, the default behaviour in Destroy FX plugins is that you can assign the same MIDI events to more than one parameter. If you dislike that, you can turn on "stealing" mode. In stealing mode, if you try to assign an already assigned MIDI event to a parameter, the new parameter gets the assignment and the old parameter loses it. You can toggle this behavior via the contextual menu option "Steal MIDI assignments".
change presets with program change messages:
Just send a MIDI program change message to any Destroy FX plugin and it will switch to that preset, unless the program change number is greater than the number of presets that the plugin has.
Transverb has a special preset: 15. Sending that program change message will tell Transverb to randomize its parameters. (Actually in the VST version, any program named "random" will do that, but by default program 15 is the one with that name.)
important notes about compatibility:
Right now Logic (5.0 or higher), Ableton Live (4.0 or higher), Max, Plogue Bidule, Cakewalk, Cubase, Nuendo, REAPER, Numerology, AudioMulch, FL Studio are, to the best of my knowledge, are the only hosts that support sending MIDI notes to non-instrument audio-processor plugins.
In Logic, the way to make a Destroy FX plug work with MIDI is to first insert it as an audio instrument (starting in Logic 8, effect plugins like these show up in a separate sub-menu there called "AU MIDI-controlled Effects"). Then use the sidechain menu in the plugin window to choose an audio track to route into the plugin. The MIDI will come from the sequences on the audio instrument track (or live MIDI input if that track is selected in the Arrange window) and the audio to be processed will come from the sidechain track.
In Cakewalk, Cubase, and Nuendo, the way to make a Destroy FX plugin work with MIDI is to first insert it as an effect. In Cubase and Nuendo, you must also "activate" it before doing anything else. Now it will be included as a MIDI device/destination in the app's MIDI output devices list. In the output device menu for the MIDI tracks, you will now see the plugin's name listed as an available option. Select the plugin as the output device for one of your MIDI tracks and now that MIDI track's output will be fed into the plugin and allow you to send MIDI to the effect. You can either do that with a prearranged MIDI track or live with a MIDI device when that particular MIDI track is selected.
Using Cakewalk as an example, here we have the affected audio track (1) and the midi control track (2). Add a plugin like Rez Synth to the audio track, like you'd add a normal audio effect:
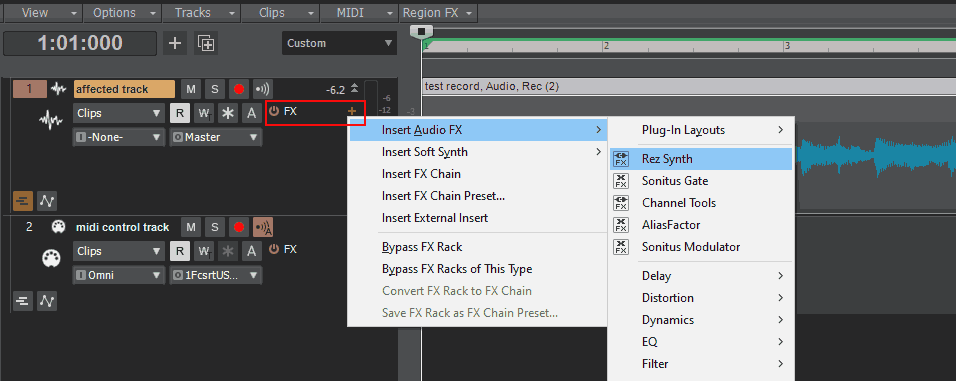
In this host, the setting to enable the plugin for MIDI input is hidden in the "VST2" menu:

Now the plugin instance (here, "Rez Synth 1") is available as an output for all MIDI tracks. Set this as the MIDI output for track 2, the midi control track:
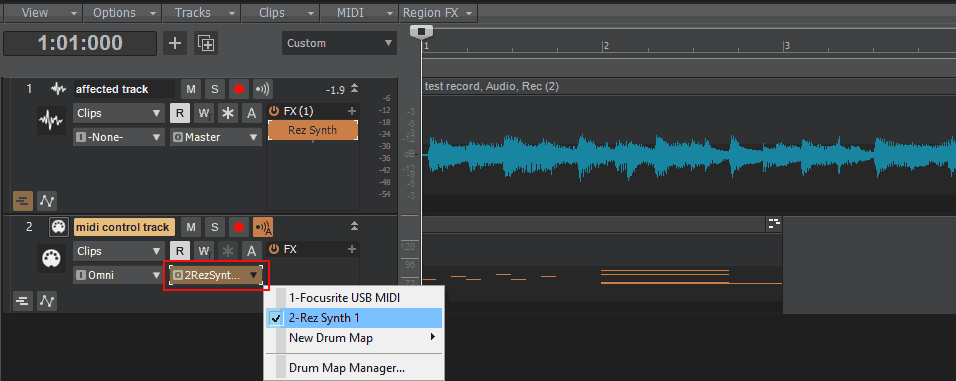
The sound output will be from the plugin instance on track 1, the audio track. Track 2 will not output sound directly.
In Ableton Live, insert the plugin as an effect. Then choose or create a MIDI track, and then open the "Output" menu on the MIDI track and select the audio track where the effect was inserted. Then, if there is more than one MIDI-enabled effect inserted on that first track, you can choose to which specific effect you want the MIDI to go from another pop-up menu below the "Output" selection, but otherwise that menu will be disabled.
In Max, all you have to do is send the the audiounit~ or vst~ object midievent messages in the left inlet just like you would for an instrument plugin. But unlike instruments, be sure to feed audio into the inlets as well. Also be sure to activate your dac~ before sending any midievent messages, otherwise the messages will be ignored (this is the case with all MIDI-enabled VST plugins in Max).
In REAPER, create two tracks: one for audio and one for MIDI. On the audio track, insert the plugin as an effect. Then press the "Route" button on the audio track to open its "Routing" settings window (if you do not see the "Route" button, enable "Routing Matrix" from the application View menu). In the "Receives" section of the new window, open the "Add new receive..." pop-up menu and select the MIDI track. In the new "Receive" section added, set "Audio:" to "None" "MIDI:" to "All" or whichever specific MIDI channel you wish to route to the effect plugin. Now MIDI from the MIDI track will be routed to the effect plugin on the audio track.
In Plogue Bidule, just patch MIDI into the effect. Bidule makes no distinction between instruments and effects.
In Numerology, make sure that you have some MIDI generator module inserted before the effect plugin module, and then you can choose MIDI sources to route into the effect from the effect module's "MIDI Input" menus.
We are told that AudioMulch and FL Studio know how to send MIDI to plugins as well, but we have never tried them and therefore can't tell you how to set up our plugins in those applications.